Direct Notifications or Semaphores: A Student’s Guide to FreeRTOS Signals
Introduction
Imagine two classmates working on a lab project. One measures data, the other logs it. Whenever new data arrives, the first student has to shout “ready!” so the second can get to work. In FreeRTOS, tasks and interrupts have the same problem: they need a simple way to wake each other up. The two most common tools are semaphores and direct task notifications. They sound similar, but knowing when to use each one saves awkward bugs later. This article breaks down the differences with student-friendly examples, so you can pick the right signal the next time you write embedded firmware.
1. Why FreeRTOS Added Direct Notifications
Semaphores are the older tool. They behave like a shared counter: tasks can “give” or “take” the semaphore to signal events. Under the hood, FreeRTOS implements semaphores using queues, so each give or take touches queue data structures, checks lists, and may even use heap memory. Direct notifications were added later as a lighter option. Instead of building a queue, FreeRTOS stores a 32-bit value inside the task’s control block and toggles it when a notification arrives. Because no queue is involved, the path from the signal to the waiting task is shorter and faster.
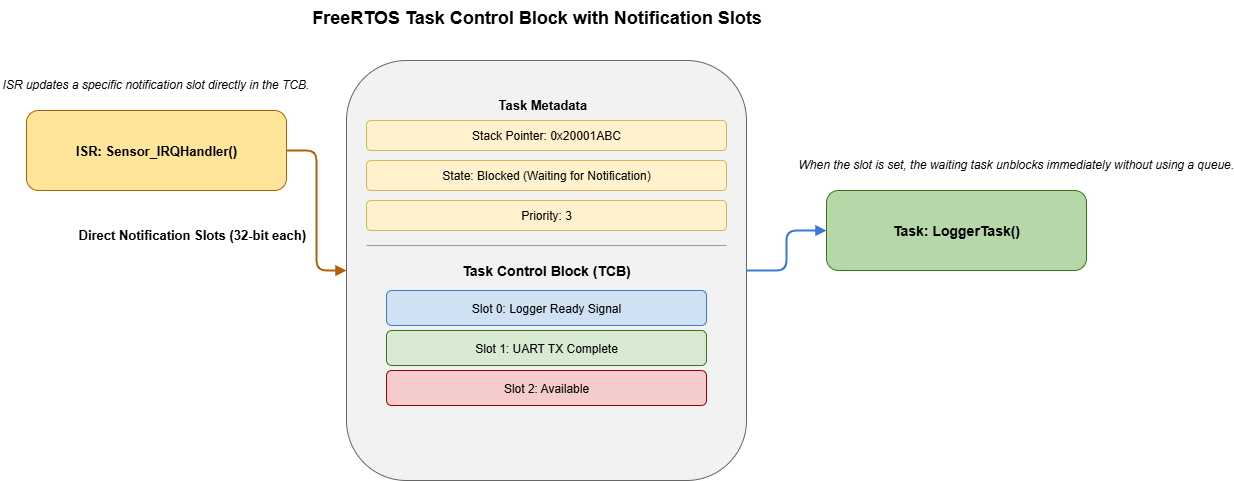
Figure 1: Direct notification slots stored inside the FreeRTOS task control block.
There is a trade-off. Each task only gets a handful of notification slots, and each slot can be used by only one sender at a time. Semaphores, in contrast, can be shared across many tasks. So the real question becomes: do you need a general-purpose tool, or a streamlined one-to-one signal?
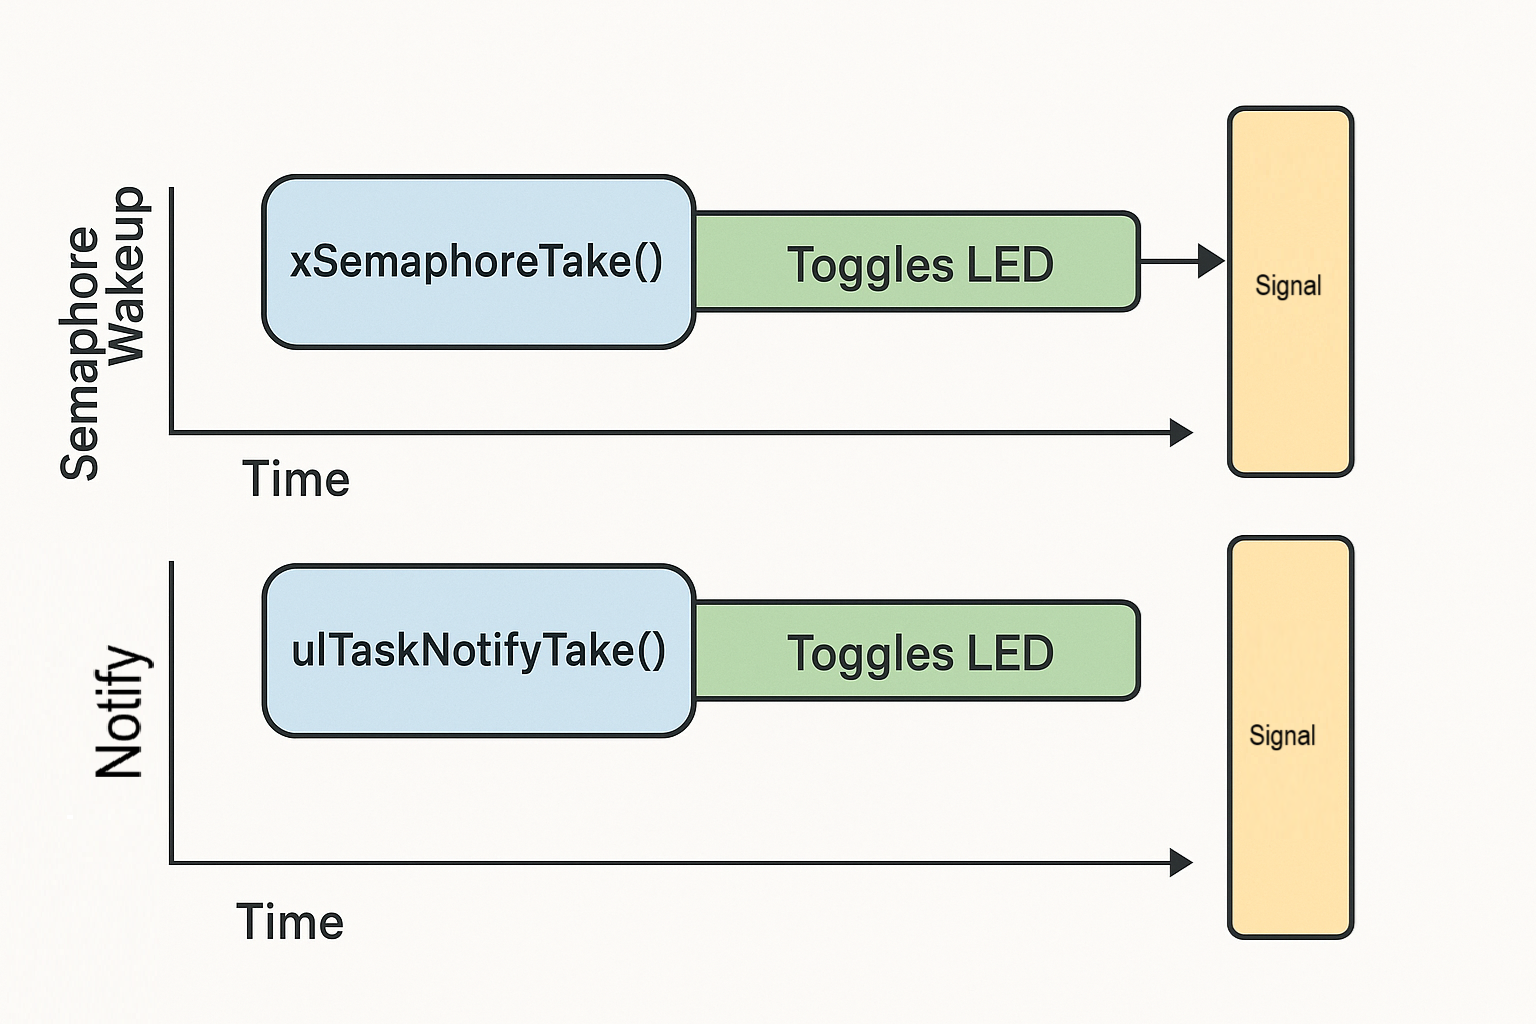
2. Task-Level Behavior: Counting vs. Coalescing
Picture a task that blinks an LED every time a button is pressed. If it waits on a binary semaphore, every button press gets counted—even if the task is busy for a moment. The semaphore remembers that someone rang the bell.
// Using a binary semaphore
SemaphoreHandle_t buttonSem;

void LedTask(void *arg)
{
    for (;;)
    {
        xSemaphoreTake(buttonSem, portMAX_DELAY);
        ToggleLed();
    }
}
Now try the same idea with a direct notification:
// Using a direct notification
void LedNotifyTask(void *arg)
{
    for (;;)
    {
        ulTaskNotifyTake(pdTRUE, portMAX_DELAY);
        ToggleLed();
    }
}
By default, direct notifications collapse multiple signals into one: if the button fires twice before the task wakes, the task only notices a single notification. You can flip the behavior by using the increment action (ulTaskNotifyTake with pdFALSE), but it is something to keep in mind. For many student projects with one producer and one consumer, coalescing is fine. If you need to count every event, stick with a semaphore or carefully configure the notification.
3. ISR Interactions: Picking the Faster Wakeup
Interrupt service routines (ISRs) live on tight deadlines. They should set a flag and exit quickly so the CPU can return to normal work. Giving a semaphore from an ISR is safe, but it involves extra list management. Notifying a task from an ISR is faster because FreeRTOS already knows exactly which waiting task to poke.
void EXTI15_10_IRQHandler(void)
{
    BaseType_t shouldYield = pdFALSE;

    vTaskNotifyGiveFromISR(loggerTaskHandle, &shouldYield);
    portYIELD_FROM_ISR(shouldYield);
}
The catch is that only one task can wait on that notification slot. If multiple tasks need to react to the interrupt, a semaphore (or event group) is the safer choice. For a single consumer, direct notifications keep latency low and reduce the chance of missing fast back-to-back interrupts.
4. Try It Yourself: Two Tiny Experiments
The best way to learn is to build a quick demo. Set up two tasks: a producer that sends a signal every 100 ms, and a consumer that prints or toggles an LED. First connect them with a binary semaphore, then swap in a direct notification.
- Burst test. Temporarily speed up the producer to 10 signals per millisecond. Watch how the consumer behaves. The semaphore version prints 10 times, the notification version may print once unless you use the increment mode.
- Slow consumer test. Add a short delay inside the consumer to simulate heavy work. Make sure the ISR path you choose does not overflow the semaphore or drop notifications.
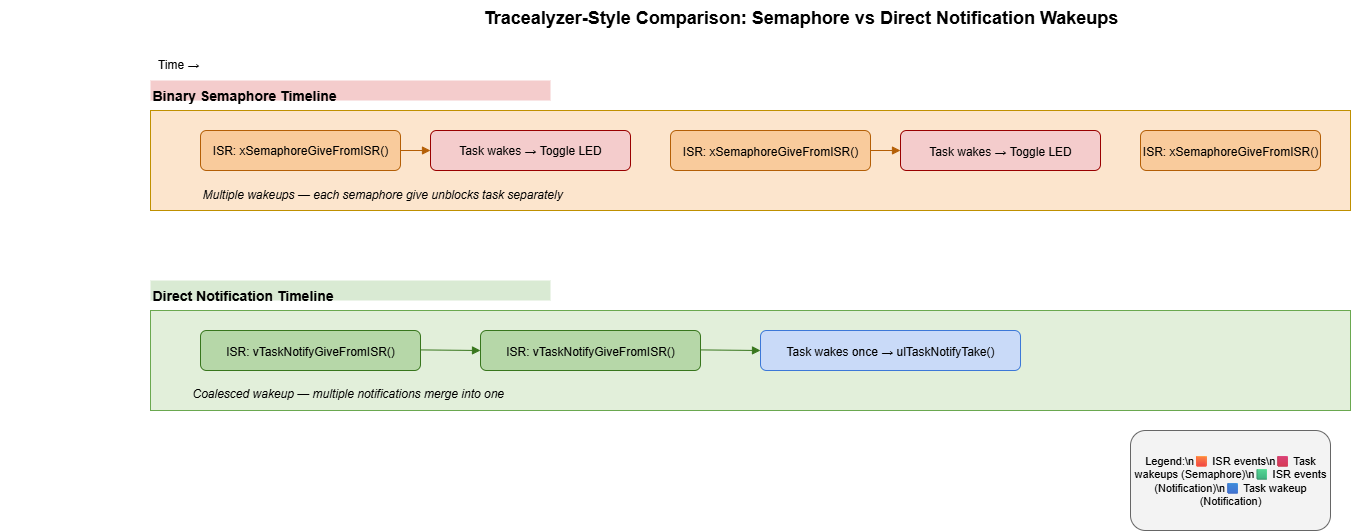
Figure 2: Tracealyzer-style output contrasting semaphore and direct notification wakeups.
If both experiments behave as you expect, you have picked the right tool. If not, switch to the other signaling method or adjust the notification mode. Document your decision in the lab report so your teammates know why the signal works the way it does.
Conclusion
For beginner FreeRTOS projects, the rule of thumb is simple. Use a semaphore when more than one task might wait on the same event or when counting every event matters. Reach for a direct notification when you have a single producer and a single consumer and want the fastest wakeup possible. Both tools are just ways for tasks and interrupts to say “your turn,” but understanding their differences keeps your firmware predictable. Try both in small experiments, trust the results, and you will spend more time building features and less time fighting mysterious missed signals.